The online racing simulator
Share your modding tips and tricks
Recently I got a PM with a question about taillight shading of my Felicia mod, which inspired me to start a thread, where modders can share their techniques to learn from each other to make more high quality mods in the future. Therefore I will start with a few visual "tricks" which I have used and might be helpful Smile

A texture-based ambient occlusion
Sometimes dark points are not enough for a smooth ambient occlusion. In those cases a texture can be used. Professionals can bake it, beginners can draw it by hand (I personally prefer drawing). This texture can be combined using transparent layers.


A shaded roll-cage
A strange looking roll-cage shading is a common problem of many mods. To enthance shading approximations of a cage a simple texture can be used. For a better result, the alpha channel should correlate with black color which will remove unwanted gloss under the ceiling.


A Felicia tailight effects
I have used multiple "tricks" to build this one. First the "yellow light around a bulb" is done using a texture. The default color of the taillight is red which hides a white places in the texture. The color of a lit taillight is yellow, which overrides the red color.

Secondly, IRL the tailights reflects daylight from various angles. To approximate a distribution of light in a tailight I have tweaked normals using some additional triangles, which are not visible. If you turn the Škoda Felicia mod (using a 3rd person view) in the LFS, you can see, that tailights are shaded quite differently (despite not being fully 3D).
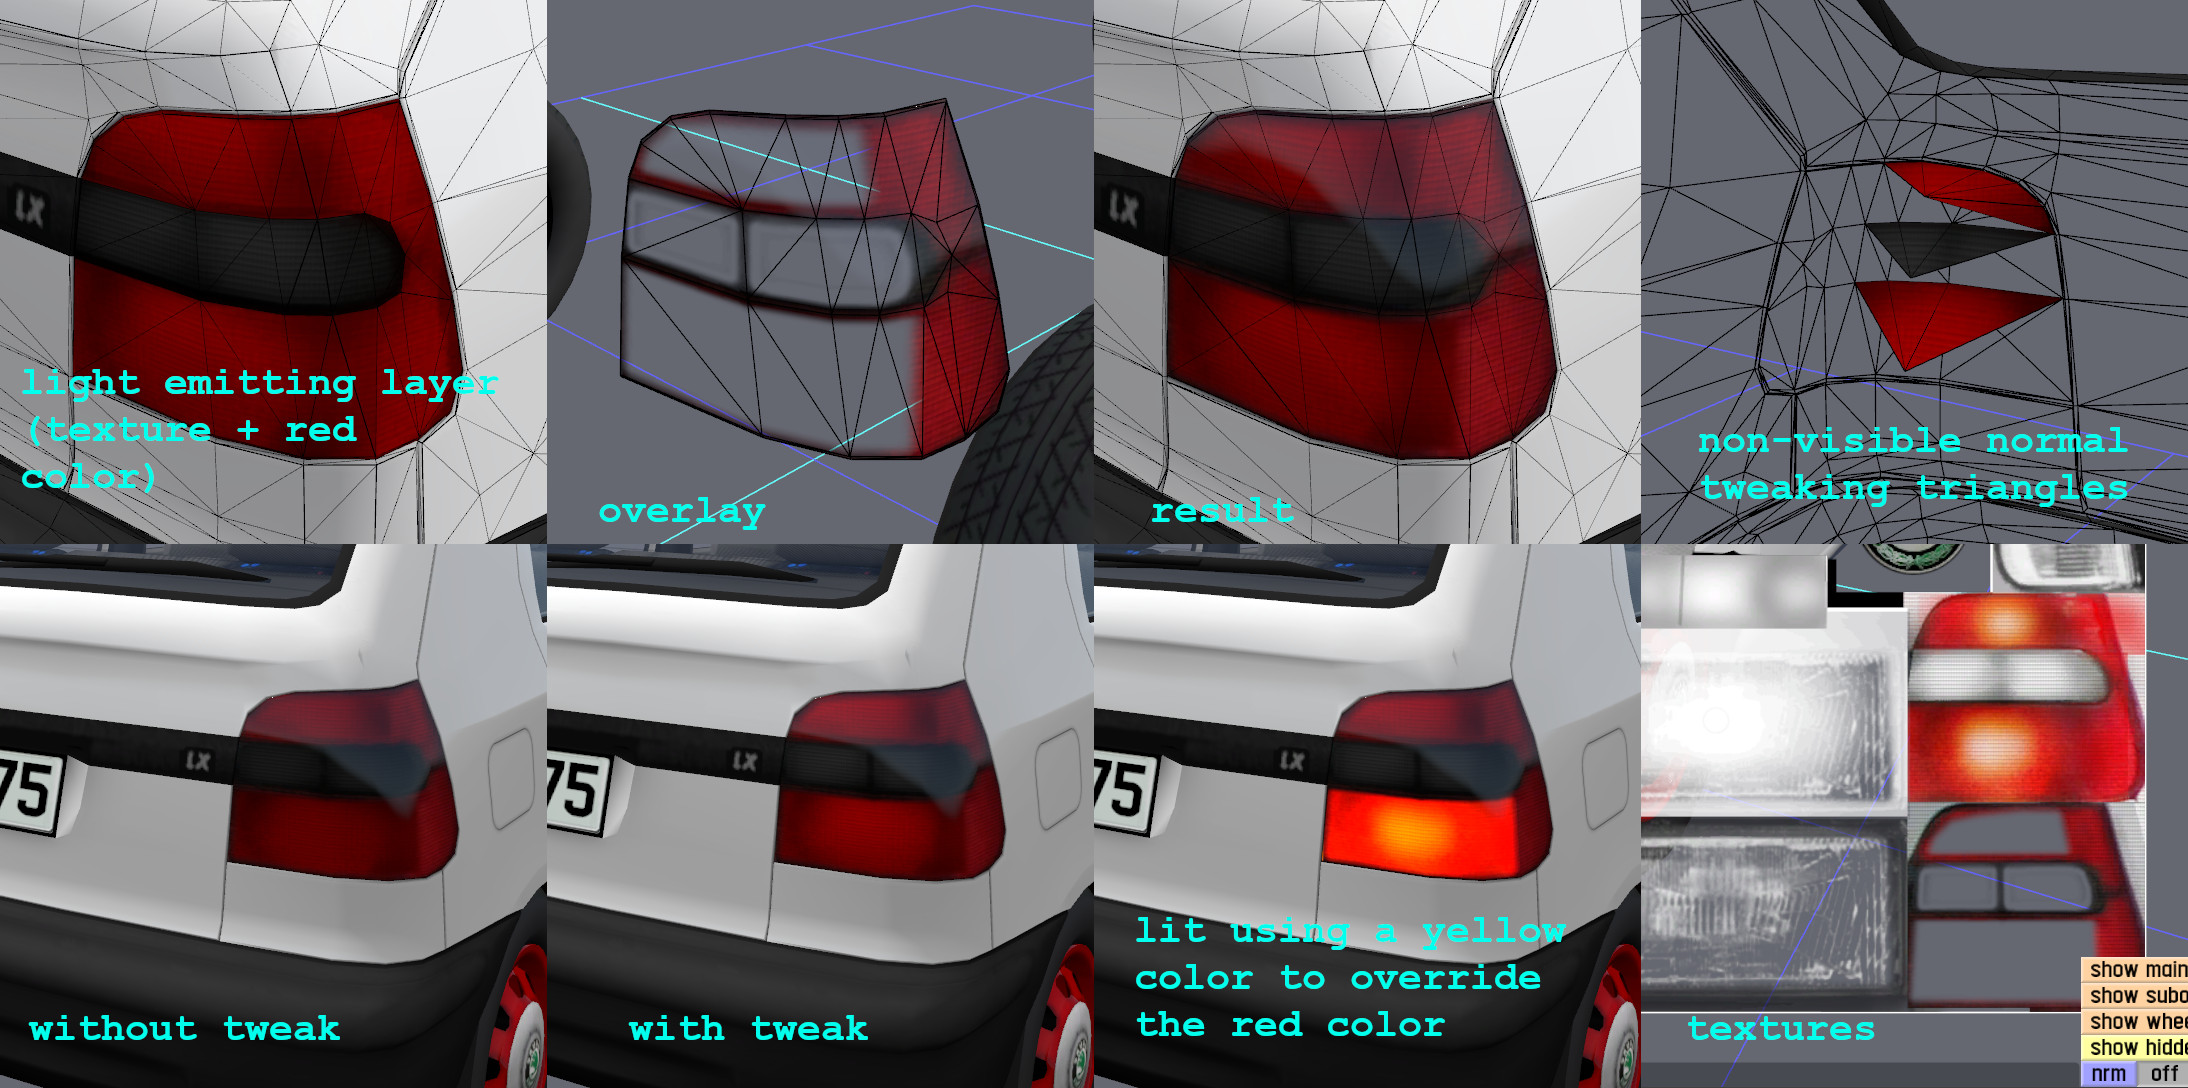


Edit: feel free to post your own tips and tricks in this thread Smile Anything about shading, topology, suspension approximations, realistic aerodynamics, engine sounds etc. could be helpful Smile
Attached images
felicia_tailights_shading.jpg
ambient_occlusion_example.jpg
rollcage_shading_example.jpg
Geometry-based toon shading

1. Copy the whole outer body (for example in Blender software) and merge it into a one "outline" object.
2. Scale the outline object according to vertex normals (alt + S in Blender edit mode) so it wraps the original body. The scaling will define width of the final outline.
3. Import the outline object into the LFS Editor.
4. Remove the windows from the outline object and attach outline window holes to the original windows
5. Remove unnecessary points by joining them (for example panel gaps) and ensure that the whole outline object has the same smoothing group to optimize number of points.
6. Flip the outline triangles.
7. Set a black color for the outline.

Attached images
toon_shading_in_LFS.jpg
This is how to make middle screen swap correctly with the driver left/right position:

1. Create an empty subobject -> select screen triangles (1st attached screenshot)
2. Break off
3. Merge into main object
4. Select screen triangles (2nd attached screenshot) -> make l.r.swap to swap
5. Now you need to edit the screen texture - you need to make a copy of the texture so you can have two versions of the same texture - one for the left side, the other for the right side (3rd screenshot)
6. Then you need to duplicate the screen cutout -> screen1 and set the flip function to [YES] - one for the left and one for the right side (4th screenshot)
7. Go to mappings and select screen mapping -> add screen1 cutout to the opposite side (5th screenshot)
8. You need to rotate/edit/adjust the 2nd screen texture so it can look correctly

You have to do the same for the rest of the flipped textures.

I have attached an example of how it should look the texture on the right side (last screenshots).

I know its not best explanation, but still better than none. Big grin
Attached images
Screenshot 2024-07-17 172017.jpg
Screenshot 2024-07-17 172538.jpg
Screenshot 2024-07-17 173301.jpg
Screenshot 2024-07-17 173939.jpg
Screenshot 2024-07-17 174109.jpg
Screenshot 2024-07-17 174821.jpg
22F543~D0DC1B8A.png
Screenshot 2024-07-17 175733.jpg
Screenshot 2024-07-17 175746.jpg
Shiny wooden material with an ambient occlusion using GIMP software

1. Take a photo of wood and colorize it according to your liking in the first layer.
2. Create the second layer by duplicating the first layer. Desaturate (Colors -> Desaturate -> Desaturate) it and adjust contrast (Colors -> Curves) so both completely white and black pixels are present.
3. Remove white from the second layer using (Colors -> Color to Alpha)
4. Change 'Mode' of the second layer from 'Normal' to 'Erase'.
5. Hide the second layer and create the third layer between the first and the hidden second. Draw an ambient light using a black 'Airbrush'.
6. Create the fourth layer by duplicating the third layer. Change 'Mode' of the fourth layer from 'Normal' to 'Erase'.
7. Show the second layer and export a final PNG texture using '8bpc RGBA pixel format' and tick the 'Save color values from transparent pixels' option.
8. Load the PNG texture in the LFS editor and use a 'Variable Shine' option in the material properties. Similar steps may be also applied on many other materials (for example leather and various plastics).

Attached images
wood.jpg
Quote from stuchlo :
A Felicia tailight effects
I have used multiple "tricks" to build this one. First the "yellow light around a bulb" is done using a texture. The default color of the taillight is red which hides a white places in the texture. The color of a lit taillight is yellow, which overrides the red color.


thx for
Attached images
lfs_00000122.jpg
lfs_00000123.jpg
Translucent window stickers

Translucent (but not transparent) materials are not supported in the LFS editor. However there is a way, how to approximate diffusion of sunlight in some cases (for example window stickers). In the picture can be seen a difference between sunshield of Škoda Felicia Kit Car mod and the original XFG GTR car. No post-processing shaders were used. The result is skinnable and its color can be defined by players.

1. Remove "double sided" option from sticker triangles.
2. Create the same triangles with flipped normals using "build mode". These must be done one-by-one. Do not use duplicate, because duplicated vertices will have their own normal vectors.
3. Select the created triangles and set their n.c. level to zero to remove bad normals. The triangles from the outside must have at least low n.c. level. This causes that the interior triangles use normals from the exterior ones without distorting the exterior shading.
4. Normals are fixed now, but the sticker is too bright.
5. Duplicate the original mapping (and cutout) and change the material to matt. Change its naming from C1_mapping to E1_mapping to darken it (otherwise it will be too bright).

Edit: One more thing - both outer and inner triangles (and the whole window) must have the same smoothing group. Otherwise the inner triangles will not use normals of the outer triangles

Attached images
translucent_sunshield.jpg
If you want a car to have day lights that also serve as turn signals, which is not that rare in modern cars, you can use a slider subobject to fake this (got the idea from the Protech mod, which however does not hide the side lights):
  1. Move the triangles to separate subobjects, e.g. DRL_R, find_R and same for left side.
  2. Make sure the origin of each subobject is on the correct side of the car (so it is properly detected as left/right indicator)
  3. Make the subobjects sliders, connect them to left/right indicator, and adjust their slide axis and distance to hide them somewhere.
  4. For the indicators, do the opposite: move the triangles to the hidden position, and make the slider show them.
Attached screenshots show the settings for one such slider object, and the result when combined with lights.

You can use the same trick to dim the DRL when the low beam is turned on, instead of keeping them as is or turning them off, but this will require a texture to properly dim them.
Attached images
LFSEditor_DRL_indicators.png
LFSEditor_Clio_DRL_indicators.gif

FGED GREDG RDFGDR GSFDG