Some people use LFS Editor to create the entire 3D model, others use Blender to create the 3D model, then export it as an OBJ file, which can be then imported into LFS Editor.
LFS Editor manual
LFS Editor video tutorials
LFS Editor manual
LFS Editor video tutorials
Maybe it could be:
The mods stored on the server and downloaded to LFS could be in an encrypted form that LFS game can read but LFS editor cannot read.
Then the only legitimate way to load things into your editor is by downloading the mod manually in editor form (not encrypted) via legitimate means, e.g. from mod's page when it allows derivatives, or direct from the author.
Problems with this:
1) All the mods currently on the server are in editor form and not ready to be downloaded in the proposed format. So a big switchover operation might be needed.
2) As mentioned before, this type of encryption, that anyone's S3 license can decrypt, can be easily cracked. Someone would release a decryption tool for encrypted mods, to convert game-ready mods into editor mods.
I don't know if this low level of security would be enough. It's not something I'll be doing in the near future though as you know what I am still working on.
+1 with this idea, since i dont know how to 3d in blender but i perfectly know how to 3d in lfs editor, so for example i can build my own things in lfs editor, then export to obj, then put it on sketchfab for example. But in my opinion, it should be only on your own works, not derivitave allowed models made by others.
I guess I'll have to go on thinking over time, as it appears the simple function is too controversial without other security measures, but those security measures are a much more complicated subject.
Maybe it's more like, the simple function should be in there, as a simple function and without its own security measures, but the protected model itself should be prevented from loading into the editor by unauthorised people.
But that is a whole new level of complication and I don't have any time to start trying to figure that out.
I also know in advance that is the least satisfying type of work, if I ever do it, I would have to work for many hours or days implementing things into the editor, the web server, the game, and all the while knowing that hackers will easily flip the switch, undo the encryption, etc. Setting out on a task that you know for certain will fail is never very enticing.

REGA LA MIERDA
Hello, that's my new car, designed from scratch, using LFS Editor only.
A small electric vehicle heavily inspired by Citröen AMI.
Ideal for fun races with jumps, ramps, obstacles etc
Here is a picture album showing how I approached the modelling of the car
https://imgur.com/a/aa8aTG9
A small electric vehicle heavily inspired by Citröen AMI.
Ideal for fun races with jumps, ramps, obstacles etc

Here is a picture album showing how I approached the modelling of the car
https://imgur.com/a/aa8aTG9
You can be certain someone will quickly find a way to look at the file with a hex editor to compare a locked/non-locked version of the same mod to know how this works, unfortunately such security is weak at best. In a way however, it reminds me of concerns about code reverse-engineering: people typically want their source code to be obfuscated in their release binaries, so people cannot (easily) just grab the code and do whatever with it (this is a topic that comes about here and there in the Godot community for instance) - the goal of encryption/obfuscation is not to make it bulletproof, but rather to deter "script kiddies" from having easy access, leaving only the more experimented and willing to invest time to worry about.
In general, having some security is better than none, especially in a legal setting, so you can say "my resource was protected and they stole it" - and in that sense, allowing OBJ export nulls that argument, because any mod can be loaded into the editor.
But then again, having the ability to export to OBJ would be useful, so it's a difficult topic

obj export will be very useful but the security is the only issue here, im sure alot of other modders like me who create mods from scratch for lfs will agree that anyone can access and rip those models or sell them somewhere on the internet.
so what if we get suggestion every time we export mod for upload that says "do you want to lock this mod" if select yes then the "veh" file will be locked and if anybody try to load it on editor after taking it from game files will get an error message that says its locked.
that way the security will be enhanced and the obj export can be possible option.
This seems impractical, I'm just talking about a simple function to export an OBJ. I can't even start to think how the suggestion could be implemented, somehow with the Editor connected online and having knowledge of where every model came from, and even track that if they saved out and reloaded the model? It's not really possible, I think.
This is only about a simple export from the modeller. As far as I know, this is a common feature for 3D software and I'm not sure if LFS Editor should be different.
I'm interested to understand what is the main concern.
Of course, LFS models can already be easily saved for reload in LFS editor.
So what is the main worry, is it that people might rip LFS mods and use them in other games?
(Although they can do it anyway but the new feature would make it easier to save a clean model)
Very true, It's the same with other popular free programs as they all have export ability's so I could rip / buy a model and share the original or re-exported file to others.
Actually a problem on sketchfab is this concept, you can tell the non-textured grey high triangle count models are (most always) rips from popular games.
It's a hard question to solve... A answer could be to hand select allowed individuals, and have a "dev" version of the editor that just includes exporting functionality?
It's only a matter of sharing LFS EDITOR file types between different editing programs through the site / discord for me. I enjoy the editor and others are starting there, while others are used to Blender or SketchUp, cad, etc.
We've found that people who want to steal models will find a way with popular tools where normal modellers have to resort to the ripping tools to just pull their derivative models / parts out to work in common external programs.
I've asked the mod reviewers about this but we didn't come to any strong conclusions.
I'd like to consider a simple (and limited) exporter to OBJ format, from LFS editor, that allows the plain grey model to be loaded into other 3D software.
It wouldn't export the mappings. Our type of mapping isn't supported in the OBJ format. Although I think it is possible (but not really easy to code) to export mapped models, there is no way to read LFS style mappings from an OBJ model. So from LFS editor point of view it's not worth coding to export with textures at this time.
Although I haven't looked in detail, I think it is simple enough to allow an OBJ export of the points, triangles and normals. I understand this could be useful and I wouldn't mind doing a few hours on that at some point.
So we are left with, what problems could arise? The only issue I see is that someone could load a mod in our editor and export the plain grey model, which might be a breach of someone's "no derivatives" license. The proposed export function just makes it easier to get a 3D model out from an LFS mod, to be used somewhere else. It doesn't really allow anything that wasn't possible anyway, just makes it easier.
MASSARICK (Ford Maverick GT)
Hello everyone, in this thread I will leave updates on the conversion and some improvements to this Maverick GT model, there are a lot of things that I don't like and I will improve within the LFS EDITOR
And also to receive tips and help with the model or with the LFS EDITOR
Original Link: https://3dwarehouse.sketchup.com/model/1284e63e-cc48-4532-8932-cdac23043405/Maverick-GT-1975
And also to receive tips and help with the model or with the LFS EDITOR
Original Link: https://3dwarehouse.sketchup.com/model/1284e63e-cc48-4532-8932-cdac23043405/Maverick-GT-1975
I cleaned up my PTH and SMX parsers, took this opportunity to create an SMX file for Layout Square (still WIP, I have the 4x4 km area but the ends are not 1:1 with LFS), and GodotInSim now has camera utility functions to convert a camera from Godot to LFS and the other way around; it's easy then to synchronize a camera between the two, and since this allows me to overlay Godot on top of LFS, I went ahead and modeled the layout editor objects (procedurally, because why not...).
All objects now have a 3D mesh in GodotInSim (except marshals), and you can easily have it load an SMX environment, load a layout, and synchronize the layout's state with LFS. This also enables editing a layout directly from GodotInSim, but there are currently no editor-like tools for that (whether I make some remains to be determined).
Also, one obvious caveat: some SMX files are outdated (Blackwood, especially the car park and industrial area) or missing entirely (Rockingham, and Layout Square for which I made my own replacement). It is also quite likely that South City and Kyoto will become outdated when their overhauled versions are released.
As a bonus related to my Layout Square SMX, I now have a working GLTF to SMX converter included (which, granted is quite limited in purpose, but if someone were to update Blackwood or create a mesh for Rockingham...).
Last edited by Bokujishin, .
One is RGB, the other is RGBA.
You need to end the filename in _ALP for the RGBA to work, and you need _ALP to not be there for RGB to work.
IE, if you have an RGB image called texture1.png and you convert it to RGBA, it must be renamed to texture1_ALP.png before it'll work properly in the editor.
You need to end the filename in _ALP for the RGBA to work, and you need _ALP to not be there for RGB to work.
IE, if you have an RGB image called texture1.png and you convert it to RGBA, it must be renamed to texture1_ALP.png before it'll work properly in the editor.
have problem with png picture to mod
Could someone explain what happened to the lamp photo that it won't load in Live for Speed Editor? If someone could fix it, of course the author would be a contributor to the mod.
regards.
problem with 2nd picture
regards.
problem with 2nd picture
Some AI racing games use that way for racing. Codemaster. EA Sports. and sometimes Beamng.drive (Depending on the car they're using.)
And Full Physics...
we can re-create Similar physics. Just Like rFactor.
They don't use the player Physics but a different Physics that isn't the same. but on track it's quite the same. but what it's the difference? They do more overtakes. More Mistakes. More Crashes. and Faster AI.
and of course for S3 Mods. they gonna keep the LFS Physics. or a Custom Made Physics which it can be made on the LFS Editor.
And About Rolling start and formation. The cars will have 2 types of System for that.
1. The normal AI.
2. Forced AI.
The normal AI will be the same as the LFS. Just driving and trying to win.
Whoever the Forced AI. will NOT apply Physics. The cars will have 2-4 Different Lines for the Rolling start. to NOT cause a crash. and after the Green flag the Normal AI will be switched up again. and the setups won't be applied until the green flag.
Why not Physics?
They probably will glitch out after spawning. and preventing crashes.
Why not Applying Setups?
Just imagine 0 Downforce. No pressure and skinny tires and scrapping suspension. the cars will go straight into the barriers. to avoid that. we won't apply Setups until the green flag it's out.
Last edited by Antonnio Giovannazi, .
Both Macan GTS and custom got some important work especially in the interior.
Custom macan got new rims & seats:


In editor:


Interior for the custom macan (leather texture got changed, added alcantara texture in some parts, added colorable stitch):


a major update in the centre for both custom and gts:


changed the carbon in the interior to aluminum for the current macan gts:


Custom macan got new rims & seats:


In editor:


Interior for the custom macan (leather texture got changed, added alcantara texture in some parts, added colorable stitch):


a major update in the centre for both custom and gts:


changed the carbon in the interior to aluminum for the current macan gts:


Mercedes-Benz C218
Hi there , this it's my C218 from : https://sketchfab.com/3d-models/mersedes-cls-63-a6453fa2846a4d62b869aecfc0276da2
This car develops around 580 hp and 800 nm of torque.
This project was done in 2 days... I took the mod from Sketchfab, reduced it in a 3d modeling application, added the project to Lfs Editor. The reduced mod in the application had around 80k tris, and I reduced the details on Lfs Editor to 65k tris, then I started mapping, texturing the car and its details. I made a new set of rims specific to this model using a Blueprint, repaired the small holes left from the reduction of details, then started working on the handling.
This mod is a work in progress, so there will be more updates.
Rim Blueprint : https://www.oemwheelshop.com/cdn/shop/products/115102_01_700x700.jpg?v=1704353697&hl=ro-RO
(I'm not at my PC right now and I don't have access to the pictures of how the mod was created, but I'll leave here 3 pictures sent to a friend)
Last edited by Eduard.kbg, .
This is not possible to set up in LFS editor - ABS yes or no,no other options available to set up ABS function.
started doing a custom macan with a V8 few days ago, and that's how it looks so far:


Nothing is done in the interior or the rims yet.
All work/modifications made in LFS Editor. No blueprints, just some references / irl pictures.
Inspired by / source: CMST Tuning

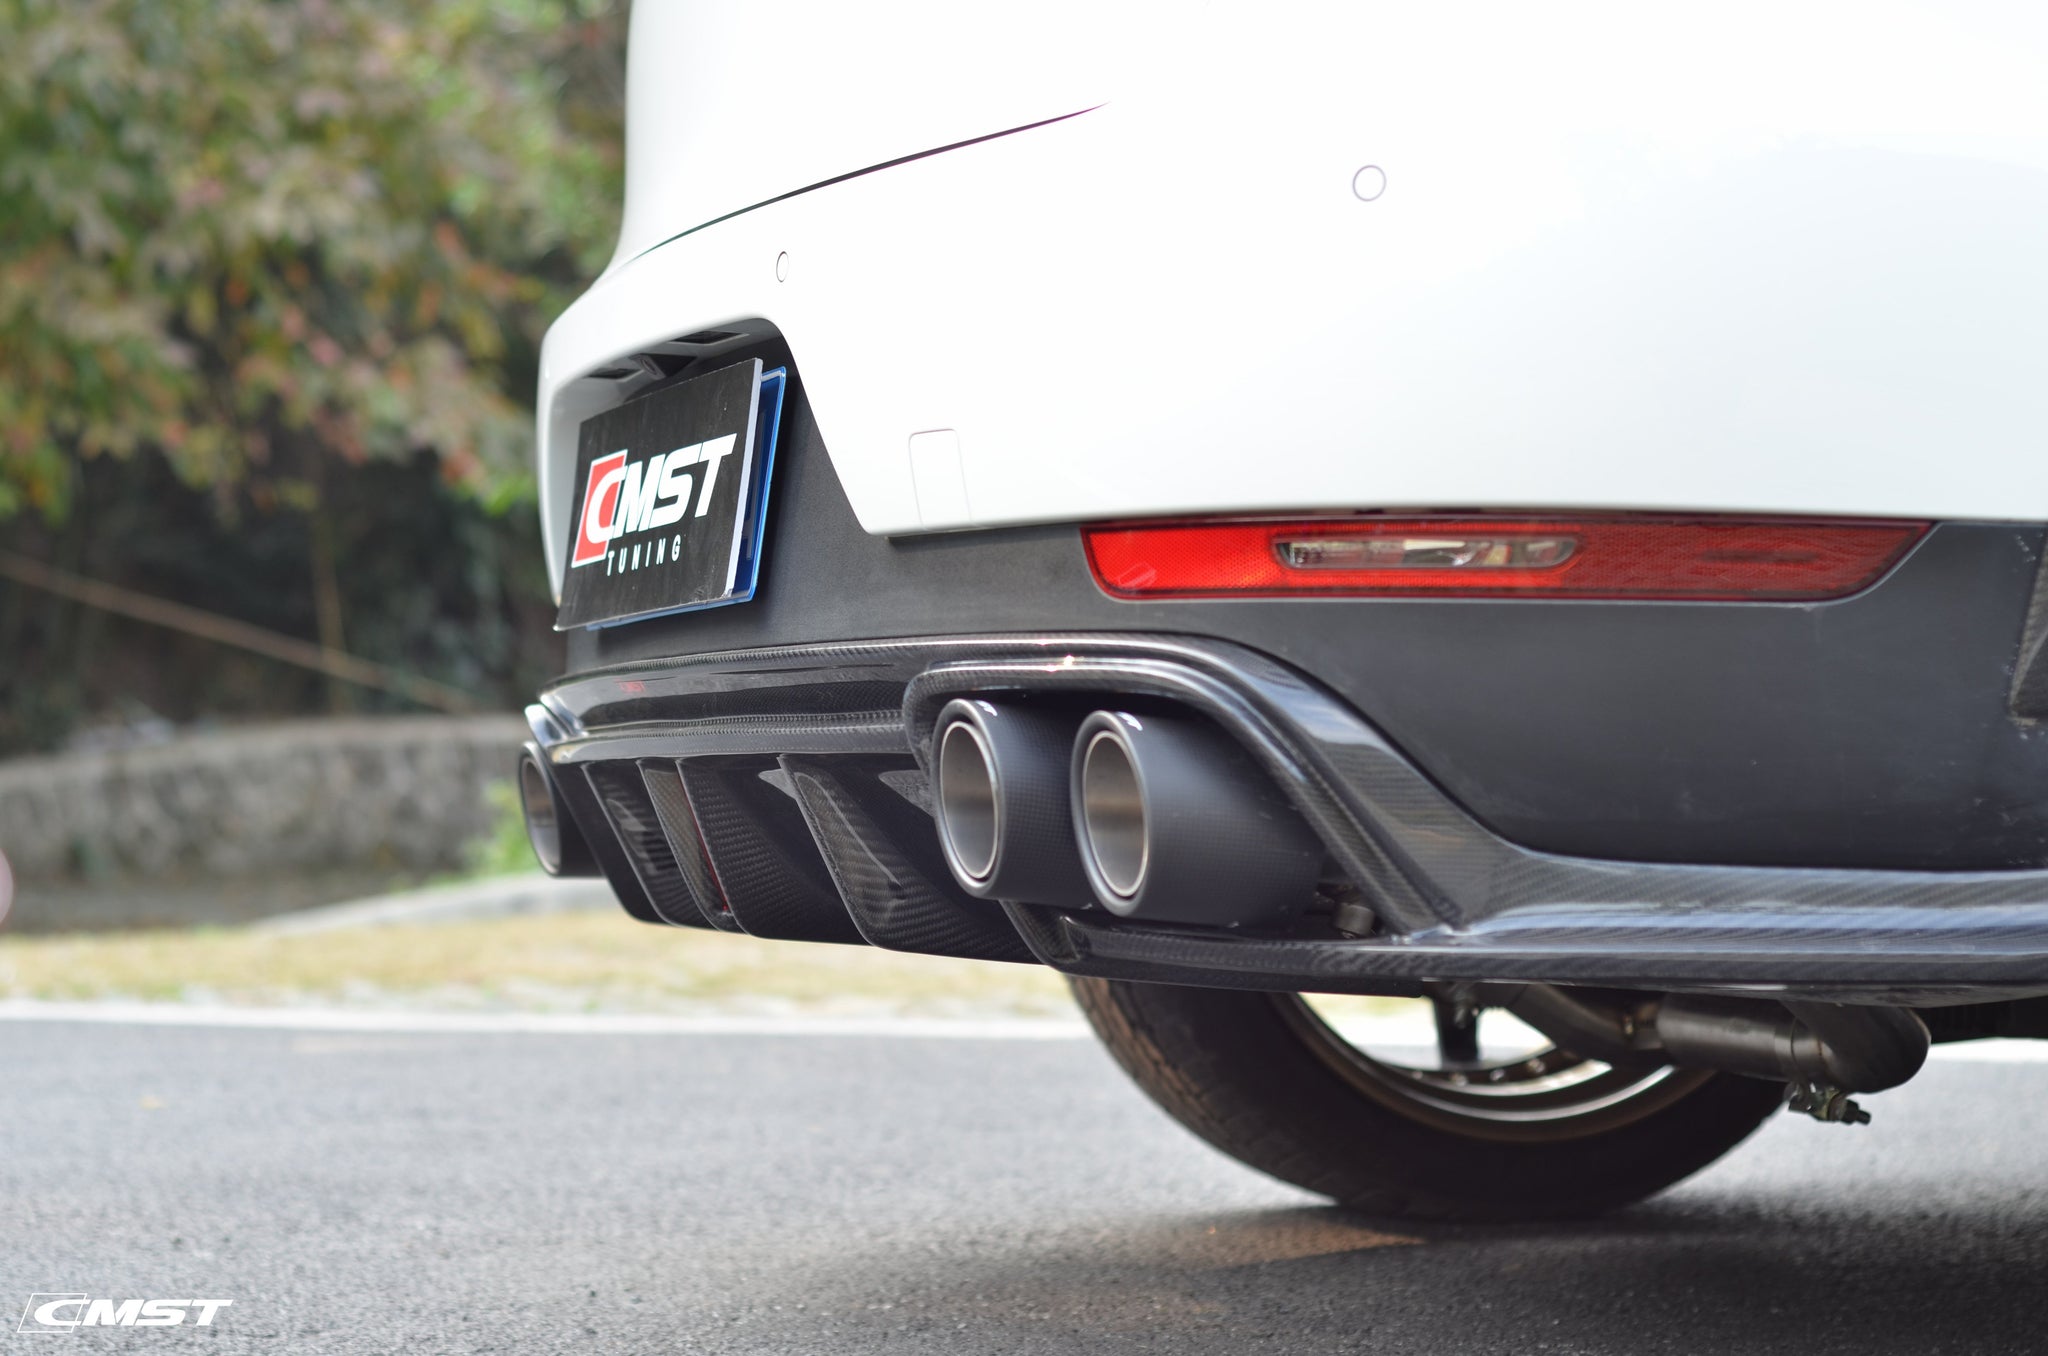

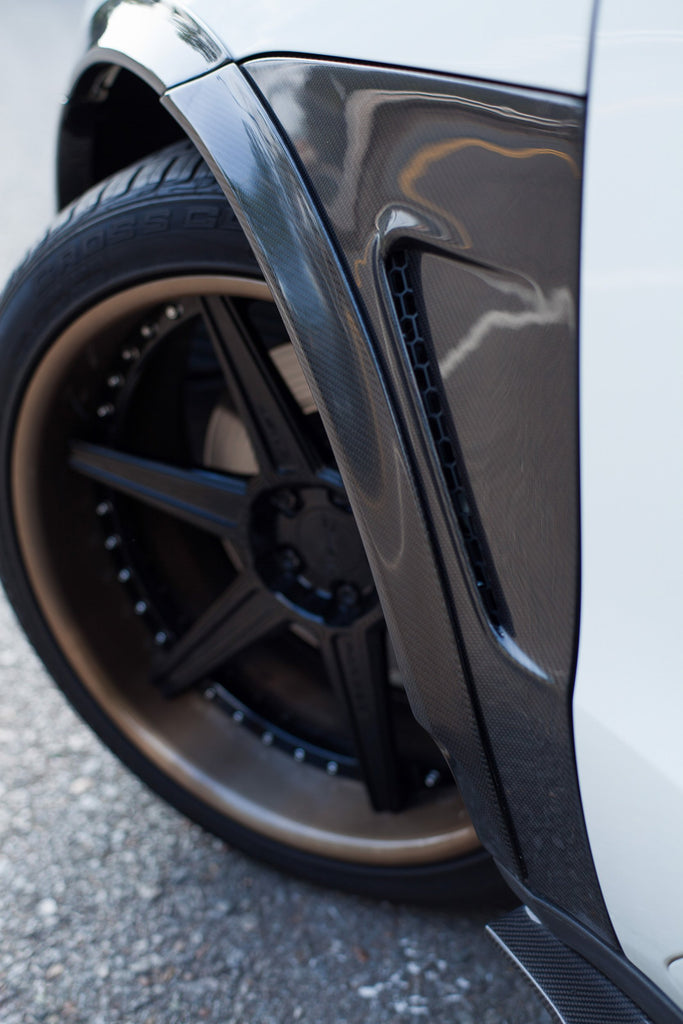


Nothing is done in the interior or the rims yet.
All work/modifications made in LFS Editor. No blueprints, just some references / irl pictures.
Inspired by / source: CMST Tuning


Last edited by M7md1467, .
Interesting project - I've always been kinda fan of this track,still remember old CART races there and actually the 1st live CART race I ever saw was run there,so I'm deffinitelly curious about this. Quick check and compared to Google Earth measurements it seems to be on scale,however the layout itself does not seem to be well made as the track consists of lines,which probably are not the best track limits enforcement,while the lots of the tyre barriers seem to be just a waste of objects (we're still quite limited in layout editor unfortunatelly). Maybe would be better if you would use the long 10m speed bumps as track limits (the 6m for turns)? Could also save few objects as these are 2m longer than lines while it would also enforce track limits better.
Too bad LFS limitations force to move finish line...
Too bad LFS limitations force to move finish line...

The list of changes from D48 to D51 includes:
In my case the stanchions and the lowers coincided only at one and only one ‘lowest wheel height’ : -115mm, which makes the front too high and to get stance right must set front too soft. By the way, this height is exactly at the intersection of the head angle line and the vertical axle projection.
Oddly enough, that ‘lowest wheel height’ (-115mm) must be only in the first set. Proper value can be set in the second set without misalignment.
But! If you delete the first set, the second set (which allowed ‘lowest wheel height’ to be freely adjusted) will turn on and fork will immediately fall apart even if no settings are touched
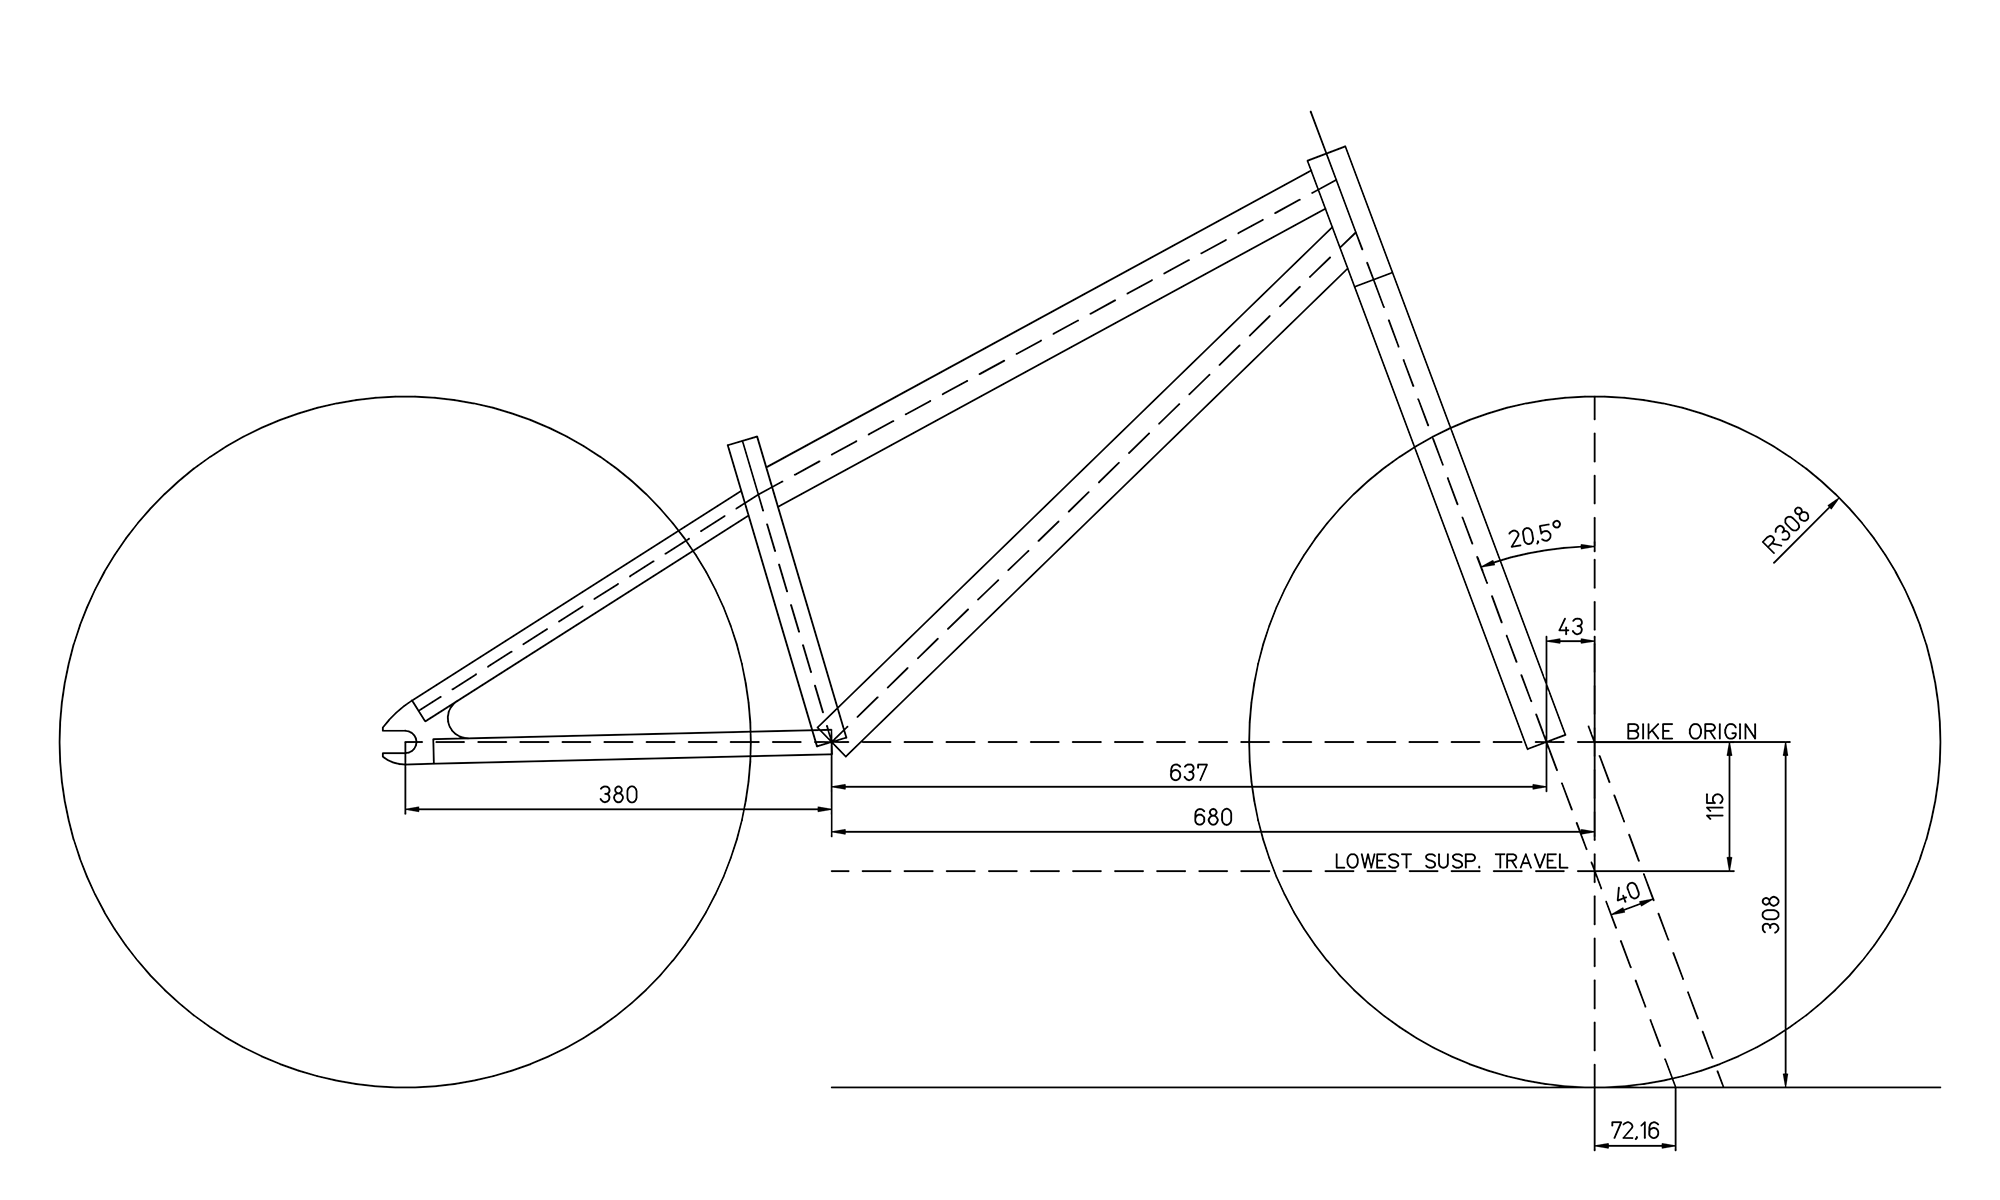
All dimensions in LFS Editor are set correctly:
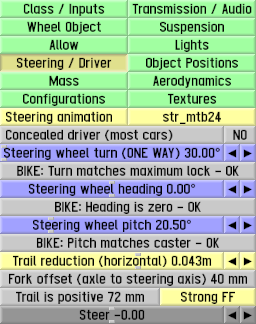
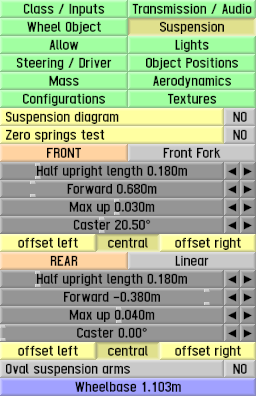
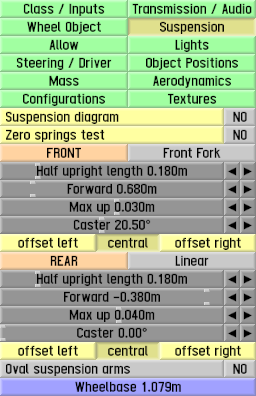
caster — 20.5°, horizontal trail reduction — 43mm, fork offset — 40mm, ground trail — 72mm, also axle coordinates -0.38 and +0.68.
Two suspension tab screenshots with different wheelbase: 1.103m [soft] and 1.079m [normal].
In my case the stanchions and the lowers coincided only at one and only one ‘lowest wheel height’ : -115mm, which makes the front too high and to get stance right must set front too soft. By the way, this height is exactly at the intersection of the head angle line and the vertical axle projection.
Oddly enough, that ‘lowest wheel height’ (-115mm) must be only in the first set. Proper value can be set in the second set without misalignment.
But! If you delete the first set, the second set (which allowed ‘lowest wheel height’ to be freely adjusted) will turn on and fork will immediately fall apart even if no settings are touched

All dimensions in LFS Editor are set correctly:
caster — 20.5°, horizontal trail reduction — 43mm, fork offset — 40mm, ground trail — 72mm, also axle coordinates -0.38 and +0.68.
Two suspension tab screenshots with different wheelbase: 1.103m [soft] and 1.079m [normal].
Improving and adding sounds
Hello everyone. I've been trying to improve the sounds in a simple way for LFS for a while now.All this with external programs-(Some Windows sound improvements).Without having to modify almost anything in the game.
1:I've added the hazard lights sound, the handbrake, and the click of the lights button:(OBS).
2:Modifying the equalization:The FXSound program gives the cars a more metallic sound and, from my point of view, a more deep and enveloping.
3:Some things from the Simhub program to make the dashboard more realistic.
(Only change in LFS)In this mod I changed the V6 engine to V8 From LFS Editor.
Adjustable Boost Pressure on Setup Tab
As some know, both drift and race cars have adjustable turbo pressure depending on the condition they're put on, for example, Porsche 935 K3 1979 had 1.5bar for qualifying with an output of 800bhp and a 1.3bar setting for race making around 670bhp for better reliability.
Since there's a lot of retro race cars like the FEND MUSTING GR5 and the PORSHELL 539, i feel like it would be nice to be able to edit this setting while on the in-game setup tab, not only it would be more realistic than just air intake restriction.
Maybe not all mods should allow it, hence why i tought this could also be included in the "Allow" tab on the LFS Editor. <adjustable_turbo_pressure=YES/NO>
Hopefuly we get this in the future, i feel like this would be a nice addition to the in game setups and also a more realistic approach to the "restriction rules".

It would be wonderful if the licensing allows for it to be included in LFS, I sure am hoping to see interest from Scawen/Eric. More real life tracks can only improve the LFS experience.
With that said, even if the data were to be made available to them right now, I assume we're looking at several years down the line for Eric to be able to make it into a proper LFS track (since he already has to update existing tracks environments, and we don't know about possible plans for new cars) - unless a mod track editor is made available, but that too would require a lot of work before it could be released.
With that said, even if the data were to be made available to them right now, I assume we're looking at several years down the line for Eric to be able to make it into a proper LFS track (since he already has to update existing tracks environments, and we don't know about possible plans for new cars) - unless a mod track editor is made available, but that too would require a lot of work before it could be released.
FGED GREDG RDFGDR GSFDG