Funny you should mention that, because I amended the track slightly to get a layout i've called 'High Plains Drifter'.
Layout currently on one of my (Sin'rs) servers, where some lap times have been recorded!
My XRG time is almost 5 seconds slower than the one recorded above, so the rest of my times should be easily beatable. And as I can't drift, all my drift scores should be easily beaten too.
I made a couple of tongue in cheek type Blackwood layouts for a demo user (who couldn't use them if he only had demo license), but they may give you idea's to make your own ....
https://www.lfs.net/forum/thread/86925
https://www.lfs.net/forum/post/1877205#post1877205
First layout is extremely short!
As for your shops issue, you'll need to give some details, especially in regard to what InSim you are using.
https://www.lfs.net/forum/thread/86925
https://www.lfs.net/forum/post/1877205#post1877205
First layout is extremely short!
As for your shops issue, you'll need to give some details, especially in regard to what InSim you are using.
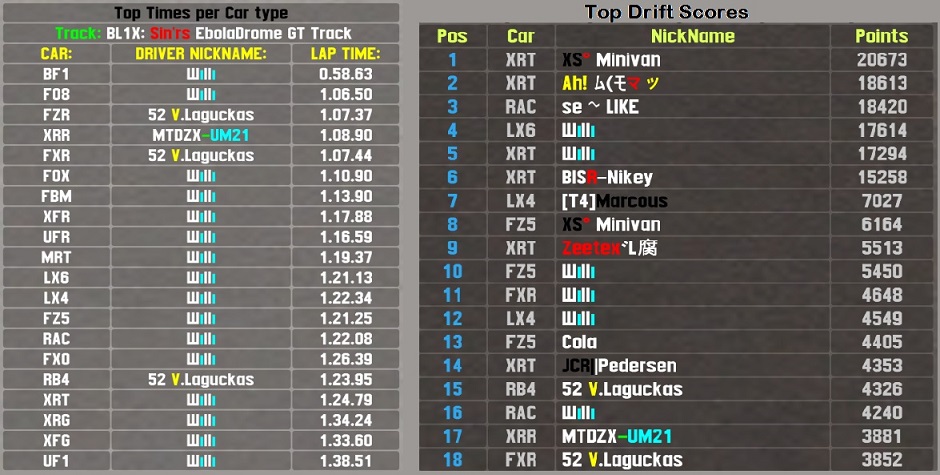
Best Times and Drift Scores after 100th recorded lap ....
[BL1Y] A Drift in Space / HIgh Plains Drifter
Amended one of my layouts for no other reason than to go with the puny pun I came up with!
It's basically for playing about on.
Overhead shot of layout ....
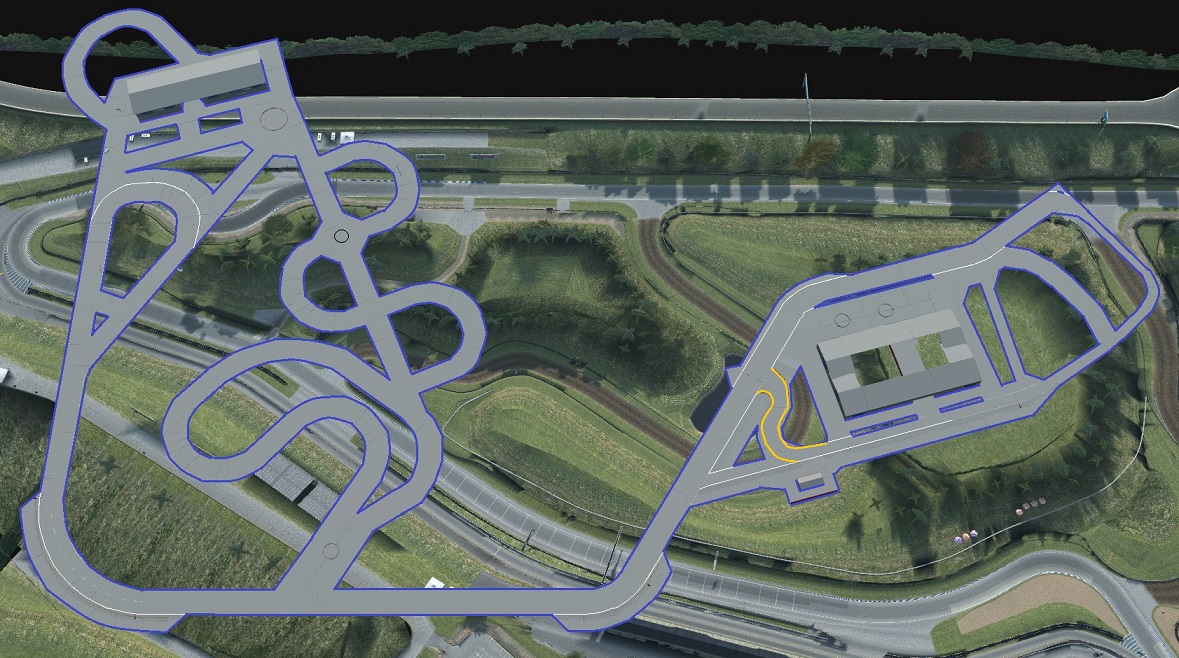
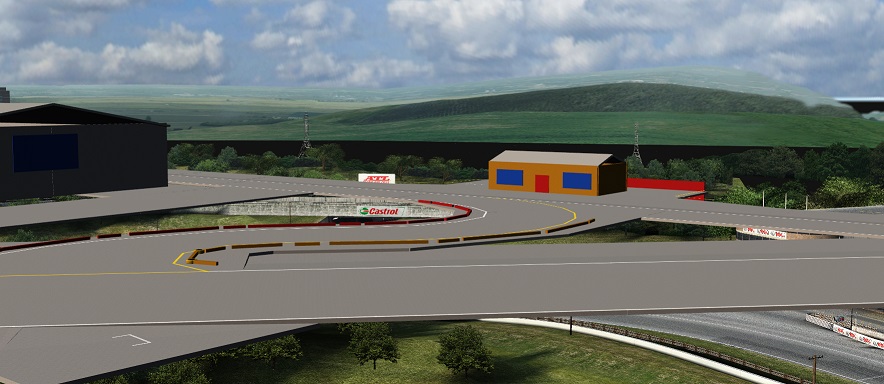
Some shots of parts of track layout ...
... little house on the layout
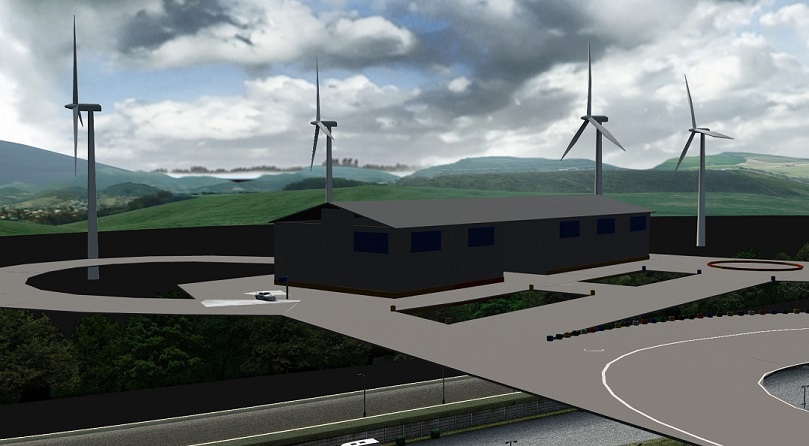
... windmills of my layout
Very little in way of barriers to stop you falling off edge, so watch what you're doing!
EDIT: Details for High Plains Drifter layout can be found few posts down.
It's basically for playing about on.
Overhead shot of layout ....
Some shots of parts of track layout ...
... little house on the layout
... windmills of my layout
Very little in way of barriers to stop you falling off edge, so watch what you're doing!
EDIT: Details for High Plains Drifter layout can be found few posts down.
Last edited by sinanju, .
Reason : Added details for High Plains Drifter layout
So, less than a week, and times have been set for each car.
Best times, and top Drift scores...
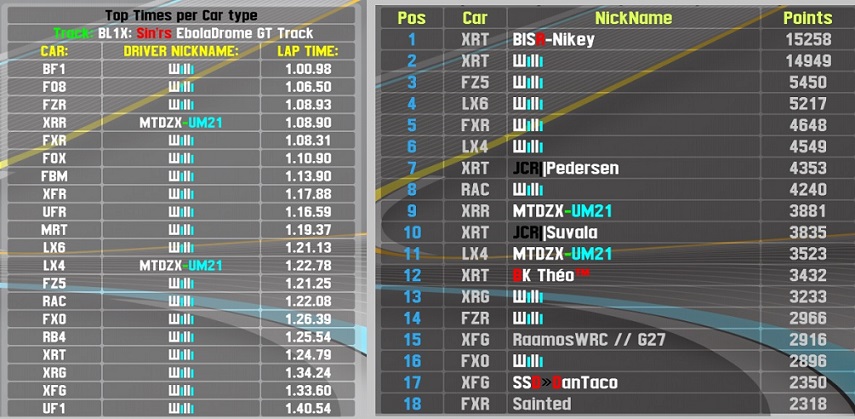
Best times, and top Drift scores...
Only just found my old Microsoft Sidewinder wheel to replace my faulty G25, so can now drive my layouts again 

Layout now loaded onto my 'Sin'rs EbolaDrome GT Layout' Server.
BL1X EbolaDrome GT layout
I've recreated the Grand Tour 'EbolaDrome' track for LFS, as close to 1:1 scale as I could, considering there's no real details anywhere, and measuring small distances on Google maps is difficult.
Layout is the 'unexploded bomb' version, where double chicane added, leading to 'old ladies house'.
Due to limitation in LFS autocross size (both autox areas are far too small for this layout), I've had to build the track layout in the air - so this is another skytrack. The track length is approx 2.375 metres / 1.48 miles long.
Also, due to lack of autocross objects (currently 1,800), large parts of the track have nothing at sides to stop you falling off. This has unintended consequence that means that you have to be more exact in your driving to get round some of the turns - no bad thing in my view, as a lot of drivers use barriers as bumpers to help to get round corners quickly. Does mean that getting a clean lap will be very frustrating!
Certain corners that are likely to be targets for 'cutting' have been sown with autocross 'restricted area' circles, so best to stay within track white lines - especially at start, where there's a left kink. There are also 'route checker' circles placed around track to make sure you drive correct route.
I've made a video of a standing start lap in a RB4 - driven slowly as I kept falling off the track when trying to video me driving fast ...
Overhead shot of track layout HERE
Start/Finish line HERE
Not straight / Your name here corners HERE
This layout will be loaded onto one of my Sin'rs servers once I get my lapper InSim working with the layout.
I'll repeat - without seeing your code script, likely not much can be done to help.
I'm not sure what translation service you are using, but it's outputting rubbish, or at least, nothing I can understand.
The Hazard Lights script is a CASE command that will output buttons ONLY when you type the word "!blink".
If you already have other buttons in your lapper script called 'blink', then the newer buttons will overwrite the older same name buttons.
Is this what's happening?
The Hazard Lights script is a CASE command that will output buttons ONLY when you type the word "!blink".
If you already have other buttons in your lapper script called 'blink', then the newer buttons will overwrite the older same name buttons.
Is this what's happening?
Without seeing your code script, likely not much can be done to help.
If you're not using 'regex' to close buttons, then you'll have to show your code (preferably saved in a zip file) so someone can look at it.
If you are using regex, then you need to change your code a bit, but it's possible that you have given multiple buttons the same name.
If you are using regex, then you need to change your code a bit, but it's possible that you have given multiple buttons the same name.
Updated times for this track layout, which is still on my Sin'rs server, along with best drift scores to date (number 1 is best score I've ever seen on any of my layouts!) ...

South City SO6y Ellhell
Made this layout a while ago, and was going to put it on one of my servers once I'd done timed laps in every car. Unfortunately, my wheel and pedals went wonky, so couldn't finish doing laps in every car.
Track layout ...

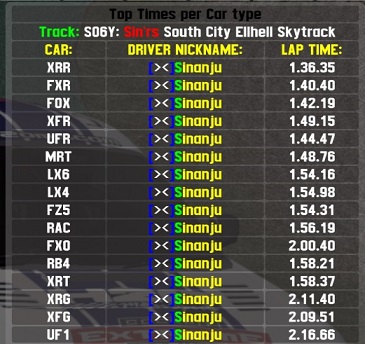
My best times (single lap sprint) ...
Different track views ...
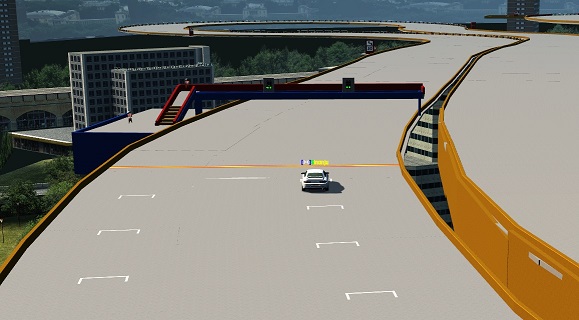

Be aware that the track isn't smooth - this is deliberate. Lots of people have complained over the years that the LFS tracks are too smooth, so I made bits that overlapped and this causes bumps. Think of it as how a track might be after a small earthquake tremor - only you are driving on an iffy track that's a long fall down!
Track layout ...
My best times (single lap sprint) ...
Different track views ...
Be aware that the track isn't smooth - this is deliberate. Lots of people have complained over the years that the LFS tracks are too smooth, so I made bits that overlapped and this causes bumps. Think of it as how a track might be after a small earthquake tremor - only you are driving on an iffy track that's a long fall down!
To help others in future who may have similar issue, can you please detail what the problem actually was, along with the solution?
What would be simpler, would be large single colour light panels that you could place and have change the colour of, both by InSim command, as is possible just now for the existing layout start-lights.
Colours of Green (safe), Yellow (warning), Red (danger), and Blue (let leaders past).
Not only could they be used for proper racing, but if you were to place the Red, Yellow (as Amber) and Green in certain permutations (vertical, horizontal), then you could make your own traffic/start lights as you suggest.
The few people who make layouts do so regardless of size of area available or number of objects that can be placed.
Increasing these will make little difference, except for those that make layouts.
Part of the challenge for the layout maker is to see if you can make something challenging with what tools we already have.
Part of the challenge for the driver, is to see if they are better at the layout than anyone else.
For someone who is likely to only spend just over 2 hours a year on LFS (5 mins x 26 fortnights = 130 mins), I don't think you are qualified to say anything about the game.
If you were to spend the same amount of time playing LFS as the average person brushed their teeth in a fortnight, maybe I'd think you had a viewpoint worth exploring, but you don't, and neither are you brave enough to put your country rather than hiding behind "other".
Nodes and Zones
For this tutorial, it is assumed that you will already be aware on how to code basic buttons.
In LFSLapper ("lapper"), you can use Nodes and Zones to ‘trigger’ a sub-routine (a ‘sub’) for something to happen, for instance, open a button to display text.
Node
A Node is an invisible line that cuts across a track, and divides the track into small sections.
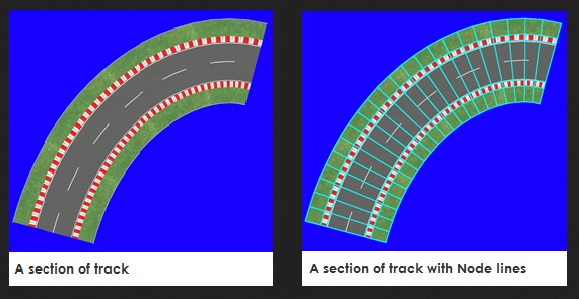
Typically, nodes would be used for Start/Finish lines, and splits/sectors. On LFS tracks, these are hard-coded in specific nodes on the track. You can place your own Start, Finish and (up to 3) split/sector lines on your own layouts. If placing these items, LFS and lapper are both configured to give timing details.
If you know the Node number, you can also define that to trigger your own sub.
Zone
A Zone is an invisible circular area that can be placed on any area of the track, or even off-track, and is used to trigger an event.
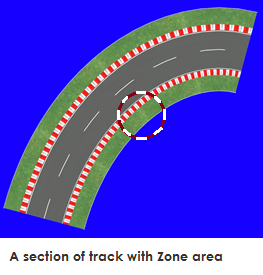
With LFS running, and LFSLapper connected to your LFS server (either online or local), you can find the Node and Zone coordinates by driving to the area you want to define then typing the following commands;
!node
!zone
Typing !node will display a single number (e.g. 123), and typing !zone will display the X and Y coordinates (e.g. -40 123).
Zone X and Y coordinates can be negative numbers as well as positive. And a zero (0).
These Node and Zone numbers will be needed for any code you make.
Once you have the numbers, you have to Register the node or zone, which is used to define the place chosen.
In lapper, the code could look like;
RegisterNodeAction
The first part of the code defines the Track name abbreviation.
The second part, the number, defines the Node line.
The 3rd part defines the name of the sub(-routine) that is to be run when a car crosses the specified node.
The double quotes can be used if you want a second sub to run when car leaves node. Replace quote marks with name of sub. Leave quote marks if no sub is to be used.
Example sub for node;
This sub basically opens a background box, with RADAR at top, and your speed underneath.
Example output of a Node sub
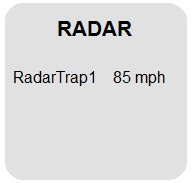
RegisterZoneAction
The first part of the code defines the Track name abbreviation.
The second part, the 3 numbers, defines the X and Y coordinates, along with the size of the zone in metres. Minimum size would be 1.
The 3rd part defines the name of the sub(-routine) that is to be run when a car crosses into the specified zone.
The double quotes can be used if you want a second sub to run when car leaves zone. Replace quote marks with name of sub. Leave quote marks if no sub is to be used.
Example sub for zone;
Example output of a Zone sub

Or to put it another way, think of SatNav - you put in your destination (the ZONE), and when you get there, you get message that you've arrived (the SUB_ROUTINE).
You can help define the node or zone by adding lines and objects, which will help to show the section better than just seeing an anonymous piece of track or off-track area.
EDIT: Updated for LFSLapper V7.0.4.4 as the sub callback for Zones and Nodes now has an extra variable ($ZoneID).
In LFSLapper ("lapper"), you can use Nodes and Zones to ‘trigger’ a sub-routine (a ‘sub’) for something to happen, for instance, open a button to display text.
Node
A Node is an invisible line that cuts across a track, and divides the track into small sections.
Typically, nodes would be used for Start/Finish lines, and splits/sectors. On LFS tracks, these are hard-coded in specific nodes on the track. You can place your own Start, Finish and (up to 3) split/sector lines on your own layouts. If placing these items, LFS and lapper are both configured to give timing details.
If you know the Node number, you can also define that to trigger your own sub.
Zone
A Zone is an invisible circular area that can be placed on any area of the track, or even off-track, and is used to trigger an event.
With LFS running, and LFSLapper connected to your LFS server (either online or local), you can find the Node and Zone coordinates by driving to the area you want to define then typing the following commands;
!node
!zone
Typing !node will display a single number (e.g. 123), and typing !zone will display the X and Y coordinates (e.g. -40 123).
Zone X and Y coordinates can be negative numbers as well as positive. And a zero (0).
These Node and Zone numbers will be needed for any code you make.
Once you have the numbers, you have to Register the node or zone, which is used to define the place chosen.
In lapper, the code could look like;
  RegisterNodeAction ( "AS1", 123, RadarTrap1, "" );
  RegisterZoneAction ( "BL1", -40,123, 5 , Ye_Olde_Shoppe, "" );
RegisterNodeAction
The first part of the code defines the Track name abbreviation.
The second part, the number, defines the Node line.
The 3rd part defines the name of the sub(-routine) that is to be run when a car crosses the specified node.
The double quotes can be used if you want a second sub to run when car leaves node. Replace quote marks with name of sub. Leave quote marks if no sub is to be used.
Example sub for node;
  Sub RadarTrap1($userName,$ZoneID)
        openPrivButton( "ts_back",180,100,20,24,1,-1,16, "");
        openPrivButton( "ts_front",181,101,18,22,1,-1,32, "");
        openPrivButton( "ts_radartext",180,101,20,8,1,-1,0,"^1R A D A R");
    openPrivButton( "ts_speed",102,107,16,5,4,6,0,( langEngine ( "%{ts_speed}%", $TrapText, ToPlayerUnit($TopSpeed), GetCurrentPlayerVar("UnitSpeed") )) );
  EndSub
This sub basically opens a background box, with RADAR at top, and your speed underneath.
Example output of a Node sub
RegisterZoneAction
The first part of the code defines the Track name abbreviation.
The second part, the 3 numbers, defines the X and Y coordinates, along with the size of the zone in metres. Minimum size would be 1.
The 3rd part defines the name of the sub(-routine) that is to be run when a car crosses into the specified zone.
The double quotes can be used if you want a second sub to run when car leaves zone. Replace quote marks with name of sub. Leave quote marks if no sub is to be used.
Example sub for zone;
  Sub Ye_Olde_Shoppe($userName,$ZoneID)
        openPrivButton( "yos_back",80,80,20,24,1,-1,16,"");
        openPrivButton( "yos _front",81,81,18,22,1,-1,32,"");
        openPrivButton( "yos _text_top",80,81,20,8,1,-1,0,"^1Ye Olde Shoppe");
        openPrivButton( "yos _text_main",80,89,6,6,1,-1,0,"^0Welcome to this shop%nl%^0where you find%nl%^0 all sorts of%nl%^0wonderful goods!");
  EndSub
Example output of a Zone sub
Or to put it another way, think of SatNav - you put in your destination (the ZONE), and when you get there, you get message that you've arrived (the SUB_ROUTINE).
You can help define the node or zone by adding lines and objects, which will help to show the section better than just seeing an anonymous piece of track or off-track area.
EDIT: Updated for LFSLapper V7.0.4.4 as the sub callback for Zones and Nodes now has an extra variable ($ZoneID).
Last edited by sinanju, .
Testing 'Lapper' with your local (offline) server
Sometimes before you run your lapper scripts on your server, it's a good idea to test them out on your own local pc and iron out any unwanted bugs. Or maybe you just want to see what lapper looks like running.
For these tasks, you should run them locally. To do so, then .....
.... open your LFSLapper file, and find the default_1.ini file (usually in /bin/default folder), and open with a text editor (like Notepad).
Edit the file by entering your password, then save and close the file.
Run LFS as normal.
Choose "Multiplayer" option.
Choose "Start New Host"
At the next scree, pick the track/layout/weather that you want to use.
Once chosen, you will be taken to the "Start New Host" screen.
Make changes as follows;
Online mode: (choose your Licence [e.g. S3] or choose what suits you.
Visibility: local
Host Name: (whatever you want to call your local host, e.g. HOME)
Host Password: enter a password
Admin Password: enter a password
IP Address: auto
Port: 63392

> Local host configuration settings
Press the green GO button.
You may get the Windows Firewall message appear. Allow access to Private networks.
When you get to the Car/Track selection screen, type
/insim 29999

> what to type
A confirmation message (InSim : port 29999) will appear in top left hand corner.
Go back into your LFSLapper file, and look for the LFSLapper.exe file (usually found in /bin folder).
Click on this file to start lapper.
If things work properly, a Command Prompt type window will open, and will give the LFSLapper Version number, along with small amount of blurb, finally ending with greater than (>) symbol. When finished with lapper, this is where you would type quit, and it will stop lapper and close this window.
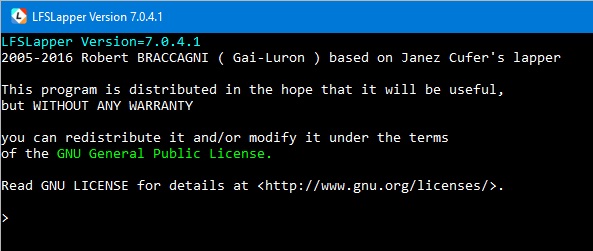
> command prompt window
If things work normally, then you will see a large Welcome message in the middle of the LFS screen.
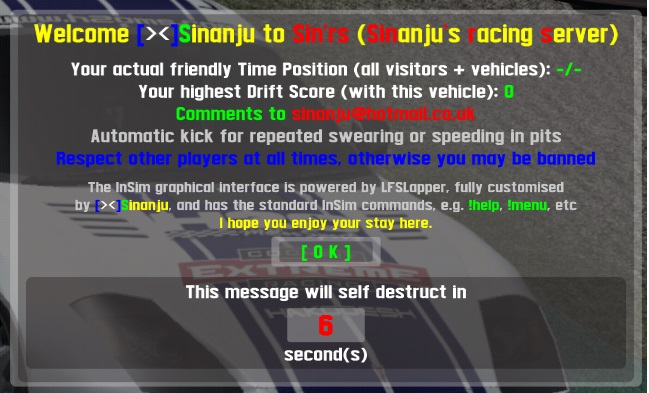
> non standard lapper made welcome message
For these tasks, you should run them locally. To do so, then .....
.... open your LFSLapper file, and find the default_1.ini file (usually in /bin/default folder), and open with a text editor (like Notepad).
Edit the file by entering your password, then save and close the file.
Run LFS as normal.
Choose "Multiplayer" option.
Choose "Start New Host"
At the next scree, pick the track/layout/weather that you want to use.
Once chosen, you will be taken to the "Start New Host" screen.
Make changes as follows;
Online mode: (choose your Licence [e.g. S3] or choose what suits you.
Visibility: local
Host Name: (whatever you want to call your local host, e.g. HOME)
Host Password: enter a password
Admin Password: enter a password
IP Address: auto
Port: 63392
> Local host configuration settings
Press the green GO button.
You may get the Windows Firewall message appear. Allow access to Private networks.
When you get to the Car/Track selection screen, type
/insim 29999
> what to type
A confirmation message (InSim : port 29999) will appear in top left hand corner.
Go back into your LFSLapper file, and look for the LFSLapper.exe file (usually found in /bin folder).
Click on this file to start lapper.
If things work properly, a Command Prompt type window will open, and will give the LFSLapper Version number, along with small amount of blurb, finally ending with greater than (>) symbol. When finished with lapper, this is where you would type quit, and it will stop lapper and close this window.
> command prompt window
If things work normally, then you will see a large Welcome message in the middle of the LFS screen.
> non standard lapper made welcome message
It will be difficult to help unless you can tell people what programming language or InSim you're going to use.
In LFSLapper ("lapper"), it's fairly easy.
You would run lapper, drive to the area you want the zone (your shop, bank, etc) to be located, type the command word "!ZONE", and you will be given X and Y co-ordinates. These are used in your code to define your zone.
The 1st part of the code would look like;
Where -60 is X, 106 is Y, and 5 is how big an area (in metres).
The "Knocking_Shoppe" would be the name of your sub-routine to run when someone enters the proscribed zone.
Example:
With other Languages/InSims, likely to be bit more complicated, especially if there's no easy way to get the X and Y co-ordinates.
Like I said in my 1st post, first you define a zone, then you run a sub-routine when someone enters the zone.
In the case of lapper, you use "RegisterZoneAction" to define your zone, then within that line of code, you have name of sub-routine, and you will have a sub-routine code which will run when a driver enters the zone.
In some cases, it would also be possible to do exactly the same with a NODE, but you can't define an area as such, just really a line that crosses the track or layout. The Finish line is a Node that has a sub-routine that runs when you finish the lap/race (e.g. give time and/or position, etc). Nodes are also used to give Split/Sector times.
Lines and objects can be placed at the Zone or Node to help define the place bit better than just an anonymous piece of track or off-track area.
So, to recap;
> define (specify X/Y co-ordinates) the area (zone/node) you want your shop (or whatever) to be on the circuit or layout
> append sub-routine code to run (what's to happen) when driver enters the defined area.
Or to put it another way, think of SatNav - you put in your (ZONE) destination, and when you get there, (SUB_ROUTINE) you get message that you've arrived.
In LFSLapper ("lapper"), it's fairly easy.
You would run lapper, drive to the area you want the zone (your shop, bank, etc) to be located, type the command word "!ZONE", and you will be given X and Y co-ordinates. These are used in your code to define your zone.
The 1st part of the code would look like;
RegisterZoneAction( "BL1" , -60,106, 5 , Knocking_Shoppe,"" );Where -60 is X, 106 is Y, and 5 is how big an area (in metres).
The "Knocking_Shoppe" would be the name of your sub-routine to run when someone enters the proscribed zone.
Example:
 Sub Knocking_Shoppe()
 <define what happens when you enter proscribed zone,
 e.g. open Button with text, such as "Welcome to XDriftingKingx's Knocking Shoppe - all welcome">
 EndSub
With other Languages/InSims, likely to be bit more complicated, especially if there's no easy way to get the X and Y co-ordinates.
Like I said in my 1st post, first you define a zone, then you run a sub-routine when someone enters the zone.
In the case of lapper, you use "RegisterZoneAction" to define your zone, then within that line of code, you have name of sub-routine, and you will have a sub-routine code which will run when a driver enters the zone.
In some cases, it would also be possible to do exactly the same with a NODE, but you can't define an area as such, just really a line that crosses the track or layout. The Finish line is a Node that has a sub-routine that runs when you finish the lap/race (e.g. give time and/or position, etc). Nodes are also used to give Split/Sector times.
Lines and objects can be placed at the Zone or Node to help define the place bit better than just an anonymous piece of track or off-track area.
So, to recap;
> define (specify X/Y co-ordinates) the area (zone/node) you want your shop (or whatever) to be on the circuit or layout
> append sub-routine code to run (what's to happen) when driver enters the defined area.
Or to put it another way, think of SatNav - you put in your (ZONE) destination, and when you get there, (SUB_ROUTINE) you get message that you've arrived.
I don't know what you know, just that you asked a question, for which I gave a perfectly good answer. Maybe you should have given more information or worded your question differently?
And you still haven't said what InSim or programming language you are using.
And you still haven't said what InSim or programming language you are using.
You have to define a X, Y 'Zone', and you can call this zone anything you want, eg shop, bank, station, hideout, etc.
With so many objects that can now be placed, you can now even make shops, etc, to stand on this zone - or mark the zone with barriers and lines.
How you define the Zone will depend on what InSim or programming language you are using. You will have to advise what this is if you want more specific information - for instance, in lapper, you 'register' a zone, and define the zone name, X and Y stats, and append a sub-routine to run when a driver enters this specific defined zone in one of their cars.
Thought I'd ask Devs if you and Yisc[NL] could be moderators for the lapper section

Use your new powers wisely!
From my viewpoint, it looks like you want more than help. In fact, it sounds like you want someone to provide you with a fully complete working system, without any effort by yourself, and likely, if supplied with a system, you would be looking for ongoing support as well.
The fact you don't even know exactly what file you've to look it, speaks volumes about your likely lack of understanding on how to code lapper, even if you manage to open and read the correct file.
Can you explain why someone should just give you a twin drift system?
Apart from being more competition for getting people on our own servers, what will you, especially as a demo user, be contributing?
FGED GREDG RDFGDR GSFDG